Site not accessible after restoring the SQL database

Many a times we face situation when some definition on the SharePoint site is deleted by mistake i.e. site or list column is deleted, in this situation, either we restore the site collection back up of restore the SQL database.

Recently, I had same case where one list column was deleted by mistake my site collection back up was too big and was taking too much time to restore. Then I decided to restore the SQL database on staging environment.

On staging environment,

  1. I created new Web Application
  2. Restored SQL database on the web application content databas

When I came back to site, site was not accessible. I understand this as my production farm is running under different farm account and staging environment in different account. Even, I could not change the site collection administrator from CA as it was not showing any site collection at all.

One sided, SQL is restored successfully, and accessible from SQL management studio. but, site collection is not shown up.

Untitled

The solution is, just remove the content database from CA for that Web application and re-attach it. And you are done.

Steps to re-attach from CA

  1. Go to CA->Application Management->Manage Content Database->Select your web application
  2. Click on Add a content Database from the top and paste the restored database name in “Database Name” field.

Enjoy!


Posted in Uncategorized. Leave a Comment »

Move all SharePoint databases from one SQL server to another SQL server

This article is not new article for moving SharePoint databases to another SQL server. Lot’s of SharePoint experts has written such articles. But, this article covers real time experience point to point.

I had situation where client wanted to move all SharePoint databases from one SQL server which was running on SQL 2014 to another server running on SQL 2016. Process is very simple.

  1. First get the list of SharePoint databases using Get-SPDatabases powershell. And put down in notepad
  2. All the databases from the above list, put offline from SQL Management Studio
  3. Go to the SQL folder and copy MDF and LDF files for all above listed databases. At this stage you are done with old SQL server.
  4. Paste in new SQL server working folder
  5. Now its time to attach the database on new SQL server. Wait, as I am moving from SQL 2014 to SQL 2016 which needs upgrade the database before attaching through SQL Management studio
  6. EXEC sp_attach_db @dbname = N'<DATABASE NAME>’,
    @filename1 =
    N'<MDF DATABASE FILE PATH>’,
    @filename2 =
    N'<LDF DATABASE FILE PATH>’;
  7. This command with automatically upgrade your database. Repeat this step for all the databases
  8. At this stage, new SQL server is ready with all SharePoint databases.
  9. Let’s ask SharePoint to go to new SQL server as its address is changed now. This process is called “Set SQL alias”. Run this “C:\windows\system32\cliconfg.exe”. Refer this link about how to set alias. You need to do this for all the SP servers.
  10. You are done.


Here is one catch in setting the alias. From the SharePoint point of view, there would be no problem in SharePoint. But, if any of your other application is referring the SQL server and you have set connection string by Name of SQL server, it will be redirected to new server instead of OLD server. It means, setting alias is machine wise not the application wise.

Enjoy!


Status Indicator Column based on “Due Date”

Many a times we need to show Status indicator in SharePoint list, specially in custom list. It is east but not OOB field. It can be achieved using Calculated column.
The idea is, we will add the calculated column,where calculated column will compare the Due Date field with Today’s date and based on the result days, it will compose one DIV and CSS will present the color code. Let’s see how?

Let say you already have column called “Due Date” (Date).

Condition is if there is 1 to go =Red, 2 days to go=Blue, more than equal to 3 days Green else Yellow (which would be never a case)

Step 1: Add calculated column let say “Indicator”

Step 2: Add this in condition text box
=”

=3,”Green”,IF([Due Date]-Today()=2,”Blue”,IF([Due Date]-Today()=1,”Red”,”Yellow”)))&”;’>•

You are done. Wait for while, it will give you result as plain string on the list view.

To render as HTML, you need to set the Calculated field type as “Number” instead of Single line text.

This will work on normal view as well as Datasheet view.

Enjoy!

Get URL of all Sub-sites using CSOM

Many a times we need to list all the sub-sites underneath of current site and sometimes sub-sites from the root site. Here, we will display the site URL of all the sub-site underneath of current site.

When you are working with SharePoint on-prem, you have option to use Table of Content web-part which do the exactly same thing.

Let’s start, I am using SharePoint online for this demo. And I’ll put all the code inside the “Content Editor” web-part.

Here is the code which you can use.

/Projects/SiteAssets/jquery-1.11.3.min.js

SP.SOD.executeFunc(‘sp.js’, ‘SP.ClientContext’, function(){
var context = new SP.ClientContext.get_current();
var web = context.get_web();
var siteColl = context.get_site();
var webSubSites = web.get_webs();

context.load(webSubSites, ‘Include(Title, ServerRelativeUrl)’);

context.executeQueryAsync(
Function.createDelegate(this, function (sender, args) {

for (var x = 0; x < webSubSites.get_count(); x++) {
var subWeb = webSubSites.itemAt(x);
console.log(subWeb.get_serverRelativeUrl());
}

}),
Function.createDelegate(this, function (sender, args) {
console.log('Request failed. ' + args.get_message() + '\n' + args.get_stackTrace());
}));

});

I am writing all the output to console. You can use the output as per your need.

Enjoy!

Development approach on SharePoint platform -by experience

When you have SharePoint project to start, you need to take some decisions. Decisions might be about the capacity planning, all time availability, performance etc. All such decisions are pre-development decisions I called it. When it comes to the development, as a being architect, you need to take decision about how you want to deliver the technical solution of business requirement.

This decision is completely depend on the business. Same architect may adopt different approach for different business. There are two approaches are popular in development.

1. Develop solution on development environment and restore the database

2.Develop SP features and definitions which creates resources at the time of installation of WSP

Both above approaches are right. When you go for first approach, you need to make sure that your SQL version and SharePoint editions are identical in development and production environment.

When you go for second approach, you need to make sure that your definition are allowing overwriting otherwise you will end up with different fields each time in case of any updates. Long story short, you need to control your SP feature code.

This is my practical experience which I learned over 14 years.

Hope this will help you many ways.

SPGridView – as generic webpart for any listview with sorting of columns

As SharePoint developer, we need to list the items as webpart, we can list them by using asp.net GridView control, but in general cases sorting is also required. ASP.NET gridview can serve this functionality but with lots of efforts. To handle this situation we need to use SPGridView control which can give the sorting functionality same as sharepoint list view.

This webpart is generic webpart which you can use for any list. Just add webpart on the page and configure it and its ready to list items with sortable columns those you have configured. Exciting….isn’t it?

This webpart is very flexible to work, it can be used through out the site collection, not limited to just inside the site.

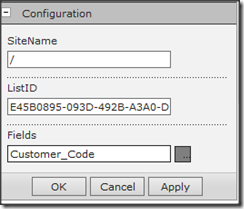
Only three steps to make this webpart up and running.

1. SiteName: URL of site (“/” for root site)

2.ListID: GUID of list

3.Fields: list your all the fields those you want to show on listing. Use “,” to separate the fields

Snap 2013-12-04 at 16.56.35

Your page is listing the items from defined list and site.

You can download code from here.

Enjoy!

Organizational Chart web part with Google api–SharePoint 2010

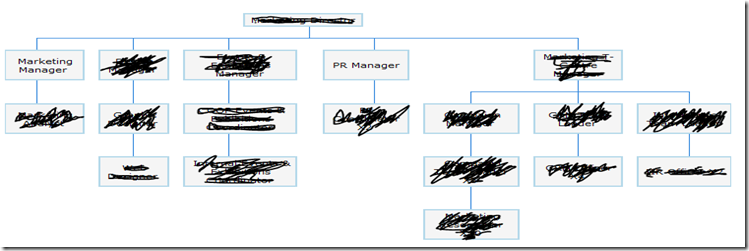
This article will give you the way to create organizational chart web part which generates the organizational chart on the fly by consuming the data from SharePoint list.

The whole idea is to create organizational chart when the requirement is like to show the organizational chart for different different departments depending on the selection of user and particularly when, the organizational chart nodes are not fixed. Means you have the only way to generate the chart on the fly, of course by consuming some data.

So, the simplest way is Google chart api, which is JavaScript base, use the Google api online( of course you can take it offline) and generates the chart.

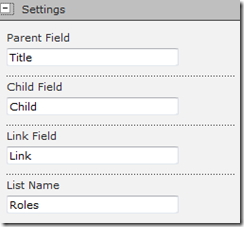
My web part doing the same, there is one list which holds the data with parent-child relationship and link url when user clicks on node, where to navigate. Also, web part has three properties which will help to generate the hierarchical nodes. These properties are…..

image


Parent Field: this field will is to starting node of chart and will be used as title of node

Child Field: this field is being used as parent-child relationship. Do not confuse with name, because, this field indicates the parent-child relationship

Link Field: this field is url on title of node to navigate on click

List Name: This field is self explain. Remember that web part will always search this list in root of site collection.


Custom List

Now, lets discuss about the list. List is basically a custom list and need to add few fields. I have used the fields..

Title: this holds the Title of chart node( parent as well as child)

Child: This is look up filed of self list with Title field. This field will define the parent child relationship

Link:This is simple text field which hold the navigation url on click

Department: This is a choice field. Which defines the department name. As this list will hold the data for all the departments. i.e. Marketing, sales

image


Make sure that when you configure the web part custom properties, it must be synchronized with list fields. And you will get the chart something like this.

image


-Enjoy

Search not crawling the site content- SharePoint 2010


When you are dealing with the SharePoint Search functionality and you do not the content crawled for few sites, you can not figure out where the problem is? Probably, you get some generic error on crawl log like “the SharePoint item being crawled returned an error when attempting to download the item”

One of the reason that I faced is “Search Core Web part. If your page is containing the Search Core Web part, SharePoint 2010 crawler will stop to crawl the content from that point. So, if you are using Search Core Web part on your home page, that entire site will not be crawled.

Solution:

Go to Search crawl log, and exclude that page from crawl, automatically, crawl exclude rule will be created. Now, onwards, your site content will start to be crawled.

In fact this problem has been taken care in cumulative updates.


Enjoy!

BCS–Connect to SQL Server with SQL authentication–SharePoint 2010


This post will give you the idea about how to use BCS to connect to SQL Server with SQL user.

The BDC is now given the new name in SharePoint 2010 as BCS (Business Connectivity Service). The interesting thing about the BCS is, its free now. As it BCS is a part on Foundation Server. And BCS is now two way operation. Means that BDS was able to only read the data from external source. But, BCS can read as well as write the data to external source.

When you use BCS with SharePoint Designer, it will allow you to use three types of connection, “SQL Server”, WCF Service” and “.Net Type”.

Select “SQL Server” and click OK

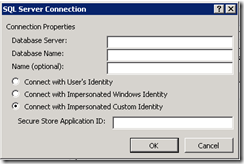
In this new wizard window, provide the server name, SQL user and password.

make sure that you select the last option in radio button list – “Connect with Impersonated Custom Identity” and provide any name in the “Secure Store Application ID”. Basically, SharePoint is using this Secure Store Application ID at the time of creation only, after that this key will be used nowhere.

image

Now, you are connected to SQL Server with SQL user.

Enjoy.